If you’re using Eclipse for developing IBM WebSphere DataPower artifacts (xslt, schemas, etc.) you can easily configure DPBuddy to automatically copy your artifacts to the appliance and do various other chores. All you need to do is to define an Ant file with DPBuddy tasks and configure the Ant file as a builder for your project.
Here are the steps:
- Create an Eclipse project for your DataPower artifacts. You can use “Generic” project for this.
- Create “build.xml” in the root directory of your project and define a target for “dp:copy” task. The example is below. Here we’re uploading all xslt files into one directory and all wsdl and schemas into a different directory on the appliance (DPBuddy will add “local:/” automatically). It is also a good idea to flush the stylesheet and document caches to make sure that your files go into effect right away (you can provide “xmlManager” attribute if you want to flush the cache only for the specific XML manager).
<target name="copy.files" >
    <dp:copy cleanDirectories="true" flatten="true">
        <!-- Destination directory can be specified at the fileset level -->
        <dpFileset dir="${services.files.home}" toDir="/xslt" includes="**/*.xslt"/>
        <dpFileset dir="${services.files.home}" toDir="/services/wsdl" includes="**/*.wsdl **/*.xsd"/>
    </dp:copy>
    <!-- Flush both document and stylesheet caches for all XML managers -->
    <dp:flushXMLCache/>
</target>
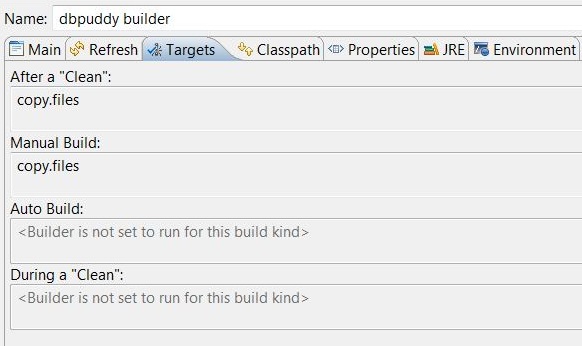
Define custom builder for your project. Go to project properties, builders, New. Select Ant Builder. Point to your build.xml on the “main” tab. On the “targets” tab specify the name of your target:
Update any of the files, then run Project/Build project or Ctrl+B. This will invoke the Ant file which will copy your resources to the target device. Note that Ant will run only if any of the resources changed. If you need to “force-run” any target, simply open build.xml and execute it from Eclipse (Alt+Shift+X, Q).
If you need to work with multiple domains, specify “dp.domain” property. You can either do it on the “main” tab of the builder definition screen under arguments (-Ddp.domain=”your domain”) or on the “properties” tab. Note that if you use DPBuddy’s “environment” task, the domain defined using an environment prefix will take precedence over the domain defined using “dp.domain” property.
If you need to copy files to multiple devices, define your connection properties using environment prefixes, e.g., “dev.dp.url=https://dp-dev”, “test.dp.url=https://dp-test”. Then use the “environment” task in your build file as explained in the User Guide. Similar to the “dp.domain”, you can then specify your “env” property on the “main” tab or on the “properties” tab of the builder, e.g., “-Denv=devtest.dev”.