Category Archives: Developer productivity

Using Eclipse for DataPower Development

If you’re using Eclipse for developing IBM WebSphere DataPower artifacts (xslt, schemas, etc.) you can easily configure DPBuddy to automatically copy your artifacts to the appliance and do various other chores. All you need to do is to define an Ant file with DPBuddy tasks and configure the Ant file as a builder for your project.

You can find the detailed steps for configuring Eclipse and DPBuddy here.

WebSphere Application Server Tutorial and FAQ — WAS in 5 Minutes

If you’re developing applications for WAS and you’re new to it, this is what you need to know:

* What is the default URL of the admin console: https://$hostname:9043/ibm/console.
* What are the default ports: HTTP: 9080, HTTPS: 9443.
* How to locate the logs: Logs can be found under $install_root/profiles/$profile_name/logs/$server_name. The default profile name is AppSrv01 and the default server name is server1. Example:/usr/IBM/WebSphere/AppServer/profiles/AppSrv01/logs/server1. SystemOut.log is the file containing everything that was logged to standard out. Logs can also be viewed from the admin console by navigating to Troubleshooting/Logging and Tracing/server_name/Runtime.
* How to start/stop a server: If you’re dealing with a “Network Deployment” type of installation (multiple application servers running under the control of the “deployment manager”), your can start/stop a server from the console (Server/Server Types/WebSphere application servers). Otherwise you have to do it from command line. Go to install_root/bin and run ./startServer.sh server_name, e.g., ./startServer.sh server1 (this assumes that your installation has only one profile defined, otherwise you may need to “cd” to the profile_name/bin directory). Make sure that you run all commands using the appropriate system account. To stop the server, run ./stopServer.sh server_name -username user_name -password password. user_name and password is the credentials of an admin account, typically the same one you use to login to the console.
* How to deploy an application: In admin console, navigate to Applications/Application Types/WebSphere enterprise applications, click on “Install new application”, select “Fast path”, accept all the defaults except that on “step 2” make sure that you targeted correct servers (if you have multiple servers/clusters in your environment). Note that you can deploy a WAR file directly, you don’t have to build an EAR. In this case, make sure that you set a context root on “step 4” screen of the wizard.
* How to change context root of a Web application: Go to Applications/Application Types/WebSphere enterprise applications/application_name/Context Root For Web Modules in the console. Re-start the application after the change.
* How to change the order of classloaders: If you’re getting a ClassNotFoundException when you’re starting the app, changing the order of classloaders is the first thing you may want to try. Go to Applications/Application Types/WebSphere enterprise applications/application_name/Manage Modules/module_name and make the appropriate selection in the “Class loader order” drop-down (this assumes you’re doing it for a WAR module).
* How to enable dynamic class reloading: If you need to frequently update your deployed application (e.g., you use a local WAS installation for development), enabling dynamic reloading could be a huge time saver. Go to your application in the console, “Class loading and update detection”, set “Override class reloading settings …” and set polling interval to 2 seconds. See this post for more details on how to configure your development environment to support class reloading.
* How to find a host name and a port of the server: Go to Server/Server Types/WebSphere application servers. You’ll find the host name in the Host Name column. To find a port, click on your server, and expand Ports. WC_defaulthost is the HTTP port and WC_defaulthost_secure is the HTTPS port.
* How to kill a JVM: If the normal “stop” routine failed to stop the server in a reasonable amount of time, you may need to kill it. In a “Network Deployment” environment, simply navigate to the list of servers, select the server and click “Terminate”. A node agent will kill the JVM for you. To achieve the same from command line (the only option if you’re running standalone), cd to install_root/profiles/profile_name/logs/server_name, and kill the process ID contained in the file server_name.pid. On Unix, you can simply do kill -9 `cat server1.pid` (assuming server1 is your server name). Use task manager or taskkill /PID on Windows.
* How to browse JMS messages: Go to Buses/Your bus name/Destinations/Your destination/Queue points/Your queue point/Runtime/Messages.
* Where to find configuration files: WAS has many configuration files, most of them are in XML/XMI format. The files are located under $install_root/profiles/$profile_name/config/cells/$cell_name.

This post is part of the series on WebSphere Application Server administration. Please subscribe to our blog if you’d like to receive updates.

We offer professional services in the area of WebSphere architecture, implementation and operations. If you’re looking for help with any of these tasks, please let us know.

Eliminate the Need to Redeploy Your Web Files

Some application servers require that location of the development workspace has to be different from the location of the deployed application. For example, you can easily point Tomcat to the root of your Web application using “docBase” of the “Context” element. But you’re out of luck with WebSphere Application Server (WAS). You have to go through a separate application update process (using admin console or Rational Application Developer tooling) to synchronize your deployed application with the workspace. In my view, this update (a.k.a. “deployment”) step should never be required in a local development environment. It is one thing to have to deploy to a test or a production environment that consists of multiple servers that are segregated from the machine hosting the build artifacts. But in a situation when both the code and the application server are sitting on the same machine, the deployment step is redundant. We should be able to simply tell the app server where the code is and it can then do whatever is needed to load the code into JVM.

Luckily, we can get pretty close to this vision with a few very simple (and free) tools.

In my previous post I explained how to enable dynamic class reloading for WebSphere Application Server and avoid having to deploy your Java changes altogether. But what about changes to JSPs and other non-Java resources? How can we synchronize the directory used by the application server with the development workspace?

Turns out, there is an Eclipse plugin that does exactly that. It’s Filesync plugin developed by Andrei Loskutov.

As the name implies, the plugin automatically synchronizes workspace directories with external directories by doing one-way copy of changed files. It allows to specify multiple directory pairs and also to define include/exclude patterns and even use variable substitution.

To enable automatic updates of JSPs in the deployed application directory all you need to do is to define a folder pair that links web root in your workspace with the location of the exploded WAS directory in WAS (usually located under profile_root/installedApps/cell_name/app_name.ear/app_name.war).

With WAS you need to watch for static “<%@ include %>” directives in your JSPs. WAS will not reload included files unless you also update including JSP. A workaround here is to turn everything into “jsp:include” actions or use JSTL’s “c:import”. There might be a slight performance penalty for doing that but improved productivity is well worth it.

You can use Filesync plugin to synchronize your class files as well. This provides an alternative to the resource link-based approach that I described in the previous post. I still like using resource links better because they can be defined using Eclipse variables which makes it easier to share the configuration within a team. As far as I can tell, with Filesync you have to use absolute paths.

Here’s how the filesync configuration screen looks like:
Filesync configuration

Another good use of Filesync is to pull jar files from an external directory. Projects typically have a repository-like location where all third-party jars are checked-in (or it could be a full-blown Maven repository). You can easily add an external jar to your classpath in Eclipse. But how to put it under “WEB-INF/lib” where it needs to end up for the application server? With filesync it can be done easily by adding yet another folder pair.

In short, Filesync allows you to assemble your application “on the fly” without having to run an external build process. It also completely eliminates the need to explicitly update deployed applications.

Instantly Redeploy Your Classes to WebSphere Application Server

Any developer wants to see the code changes instantaneously reflected in the application server.
However, when using WebSphere Application Server (WAS), developers usually have to go through the process of deploying an application to the server. Even though the deployment support is integrated into Rational Application Developer (RAD) or Eclipse WTP, it still introduces delays and impedes productivity. Not to mention that Eclipse WTP does not actually support WAS 6.1 runtimes, only 6.0.

This is unfortunate because actually WAS 6.1 has good support for dynamic reloading. With dynamic reloading turned on, WAS monitors changes on the file system and automatically reloads the module (i.e., all classes loaded by the module’s classloader) when it detects a change. The reloading is almost instantaneous for simple modules. For complex modules with a lot of classes or initialization logic the reloading step could take a little bit of time but it is still faster than redeploying an entire application (you should check out Java Rebel if you want a truly instantaneous deployment).

With dynamic reloading all we need to do in order to make our changes available to the server is to update class files in the location where the deployed application resides. This is especially straightforward for web application and classes under WEB-INF/classes since WAS always explodes web application archives during deployment. In case of jar files (say the ones under WEB-INF/lib) the situation is a more complicated.

Unfortunately, the location of the deployed application is usually different from the workspace where a developer makes changes. By default, deployed binaries are located under profile_root/installedApps/cell_name. While this location can be changed, the directory structure will still be somewhat different from how code is organized in the workspace.

We could write a simple Ant script to copy changes, but this again introduces a special “pseudo-deployment” step. It would be nice if we could simply make a change in Eclipse, save it and let dynamic reloading kick in without any extra steps.

Turns out that it is quite possible to make WAS and Eclipse behave this way.

First, let’s configure WAS:

* Log in to WAS admin console and make sure that “Run in development mode” is checked for your sever. This is the default for standalone installations.
* Deploy your application to WAS using WAS admin console.
* For convenience, you may want to specify a non-standard location for application binaries during installation to shorten the path, e.g., “was_installed_apps”. This step is optional.
* Go to “Enterprise applications/your_app/Class loading and update detection”.
* Make sure that “reload classes” is checked.
* Set reload interval to some reasonable number, say “3”. By default it’s set to “0” which means “never”. IBM recommends 3 seconds as an optimal interval, although I’ve been using 1 second without any issues (for relatively small modules though).
* Stop and start the application.

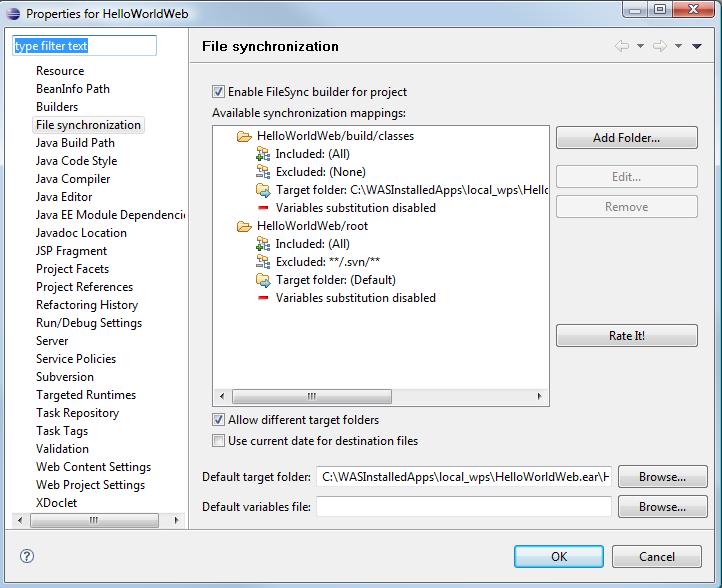
Now let’s configure Eclipse. We will have to create a resource link pointing to the deployed application and configure the project to compile classes to the deployed location.

* Go to “Java Build Path” of the project. Click on “Browse” next to “Default output folder”.
* Click “Create New Folder…”, “Advanced”, check “Link to folder in the file system”.
* Click on “Browse” and locate the root of the exploded WAR file in the deployed application location. For example, for application “HelloWorldWeb” the path will be “profile_root/installedApps/cell_name/HelloWorldWeb.ear/HelloWorldWeb.war”. Give the link a meaningful name, e.g., “deployment”. Note: if you share .project and .classpath files with other developers, use Eclipse variables instead of the absolute path.
* Click OK. This will create a resource link that you can use to specify the output folder.
* Change the output folder to point to “project_name/link_name/WEB_INF/classes”, e.g., “HelloWorldWeb/deployment/WEB-INF/classes”. Click OK.
* Eclipse will recompile your project.
* From this point forward any class change will trigger dynamic reloading on the server.
* The resource link is also available in your package explorer, so you can browse and edit the deployed files. You need to be careful if you want to edit JSPs or other files that way as they will be overridden by the next full re-deployment.

This techniques takes care of class files only. Dynamic reloading of JSP files is a different story.

Note: This has been tested only with Eclipse 3.4 and WAS 6.1 and on modules with a relatively small code base. I’d be curious to know how effective this approach is for large modules.

This post is part of the series on WebSphere Application Server administration. Please subscribe to our blog if you’d like to receive updates.

Note: We offer professional services in the area of WebSphere architecture, implementation and operations. If you’re looking for help with any of these tasks, please let us know.