All posts by Alexander Ananiev

DPBuddy — Tool For DataPower Administrators and Developers

We’re pleased to announce the release of our new product, DataPower Buddy (dpbuddy). “dpbuddy” a free command-line tool for automating administration, management and deployment of IBM WebSphere DataPower appliances. The tool supports export/import, file transfer, backups and many other functions.

dpbuddy is implemented as a set of custom tasks for the popular build tool, Apache Ant.

Here is a quick example of dpbuddy in action:


This Ant task will remove remote directories if they exist, reproduce the local directory tree (all folders under “services”) on the device and upload the necessary files based on the “includes” pattern.

dpbuddy is completely free; it can be downloaded from the dpbuddy product page

dpbuddy provides many cool features, including:

* Response from the device is presented in a human-readable form as opposed to raw SOAP/XML messages. dpbuddy makes it easy to understand error and status messages.

* Powerful remote “copy” command that automatically reproduces local directory tree on the device.

* Tight integration with Ant. Ant variables can be used inside deployment policies and configuration files.

* Easy-to-use alternative to deployment policies based on XPath.

* Ability to remotely “tail” device logs. It is even possible to automatically get new log messages similarly to Unix “tail -f” command. “tail” task can also check for error patterns.

* “Export” based on naming patterns. You don’t need to know types (“classes”) of DataPower objects; simply specify a regexp pattern and dpbuddy will export all objects matching this pattern.

* Support for self-signed certificates. No need to add DataPower certificates to the JDK store.

* Support for arbitrary SOMA requests. You can use Ant variables inside a request.

* Parsing of all commands on the client. In case of XML errors, DataPower returns cryptic “internal error” message. The actual error then has to be extracted from the device logs. dpbuddy on the other hand validates management XML commands on the client and displays error messages right away.

Go to dpbuddy product page to learn more.

PAnt 2.0.1 is Released

PAnt 2.0.1 contains an important bug fix that was preventing using certain Ant tasks from python. Specifically, the bug affected all tasks that utilize “addConfigured”:http://ant.apache.org/manual/develop.html method to handle nested elements. This included the “manifest” task and several others.

You can download PAnt 2.0.1 from the “PAnt project page”:/pant

WebSphere 7 Business Level Applications

Application management, including deployment, has remained mostly unchanged since WAS 5.

WAS 7, however, introduced a new concept — “Business Level Applications” (BLA). It would be more accurate to use the term “composite application” because this is what BLAs are — it’s a composition of Java EE applications (WARs or EARs) or other “assets”.

Unfortunately, the term “composite application” is already used in a “different context”:http://www.ibm.com/developerworks/websphere/library/techarticles/1002_lau/1002_lau.html?ca=drs- by IBM.

The word “asset” is another confusing and terribly overused term. In WAS7 it’s a “catch all” word for any kind of artifact, including jar, zip, and, with the introduction of OSGi support, an OSGi bundle (you need to have a “beta OSGI feature pack”:https://www14.software.ibm.com/iwm/web/cc/earlyprograms/websphere/wasfposgiajp/ installed to be able to use OSGi).

BLAs are created by combining applications and assets together either using admin console or scripting. BLA configuration is saved under $profile_root/config/cells/$cell_name/blas. Assets are saved under $profile_root/config/cells/$cell_name/assets.

I can see two use cases for BLAs:

* BLAs can be used to start and stop multiple Java EE applications at once. This might be useful if operationally several applications have to be treated together or if there are run-time dependencies between applications. This is especially the case if scripting is used; AdminTask.startBLA and AdminTask.startBLA provide an easy way to restart several “regular” applications.

* BLAs can be used to manage shared libraries. There is no way to deploy “traditional” shared libraries (“Environment/Shared Libraries”) using Deployment Manager; you have to use scp or ftp to copy binaries to target servers. With BLA you can simply import “assets” (e.g., a jar file) using AdminTask.importAsset command. You can then reference the jar file using “SharedLibRelationship” option of AdminApp install/update commands. This will automatically create a classloader for this library (note–this might require server restart, at least for me it did). Being able to use regular administration APIs for managing shared libraries is certainly a welcome feature.

Unfortunately, BLAs also have limitations:

* I was not able to find a way to create an asset consisting of multiple jars. This severely limits the usefulness of utilizing BLAs for managing shared libraries since a library will almost always consist of multiple jars. It is possible to import jars individually, but this is tedious and difficult to manage.

* It is not possible to deploy multiple Java EE applications using BLAs. You still have to deploy applications individually.

* There is no support for version information in BLA assets. This is unfortunate. I wish IBM though about integrating BLA assets with Maven repositories and supporting true dependency management (e.g., version resolution, transitive dependencies, etc.). As of right now the only way to import multiple version of the same asset is to append a version number to the asset’s file name.

To summarize, the BLA idea has some promise but its current implementation is too limited to be truly useful. I’m sure IBM will be evolving BLA in future WAS releases.

You can find more information about BLA in “this article”:http://www.ibm.com/developerworks/websphere/techjournal/0905_edwards/0905_edwards.html .

This post is part of the series on WebSphere Application Server administration. Please subscribe to our blog if you’d like to receive updates.

Note: We offer professional services in the area of WebSphere architecture, implementation and operations. If you’re looking for help with any of these tasks, please let us know.

WebSphere Adminstration: Getting Started with WebSphere Application Server Scripting

If you’re a WebSphere administrator or if you’re trying to automate some tasks around the IBM WebSphere line of products, you’ll inevitably be using WAS scripting (a.k.a. “wsadmin”). For the record, it is also possible to use Java and JMX-based APIs for automation, but it’s is more complex and less documented. So “wsadmin” scripting tool is the primary tool of trade for any WebSphere administrator.

There are several things that you need to do in order to be successful with wsadmin:

* Learn Python. Wsadmin uses Python as a language (JACL was deprecated a long time ago and should not be used) and relies on jython. Jython provides full implementation of Python language “sans some libraries”:http://www.jython.org/docs/library/indexprogress.html. Needless to say that good knowledge of Python is essential for developing wsadmin scripts. Most WebSphere admins have Java background. In my opinion (and speaking from personal experience), knowing Java does more harm than good for a Python developer. Java people usually speak Python “with accent” and have a hard time properly utilizing all python capabilities such as closures, list comprehensions and even modules and packages. It’s no wonder, the two languages are very different. For example, in Java everything is a class and in most cases a class resides in its own file. In Python a module can encompass multiple classes and classes themselves are completely optional. Learning how to properly use modules and classes takes some mental shift.

* Invest in designing your scripts. I’m not even sure if “scripting” is the right word to use in this context. Scripts are usually relatively simple. Wsadmin scripts are anything but. A seemingly simple task of application deployment may require many lines of code if you want to do it right. Unless you’re really trying to do something unsophisticated (e.g., “setting heap size”:/setting-heap-size), you’ll be developing a full-blown python application. Therefore, you’ll need to think about its design. Python has excellent support for modules. You’ll have at least one module in your application. Do not put any logic into the “main” file that you’ll be calling from wsadmin. Instead, define appropriate functions and classes in your modules and call them from the main file.

* Invest in setting up your development environment. Notepad or vi are not going to cut it. Remember, Python lacks compiler, so the only way to find out if your code is even syntactically correct is to execute it. That is, unless you use an IDE, such as “PyDev”:http://pydev.org/. The latest version of PyDev is very good at detecting syntax errors and many other issues, such as uninitialized variables. It also has very decent (for a dynamic language) code completion.
You will also need to setup your wsadmin shell script to supply python path (using -javaoption "-Dpython.path=your_path"). Do not forget to put python libraries (the ones that come with jython) on the python path. I prefer using “thin administration client”:/wsadmin-thin-client as this is more flexible. I also “use 2.2.1 version of jython”:/using-jython-221-with-wsadmin-tool since jython 2.1 that “comes with wsadmin”:/was-70-is-still-on-jython-21 is just too old and misses a lot of important language features.
Another practical piece of advice is to never use “wsadmin -f” to test your scripts. Wsadmin takes eternity to come up, so running it every time you want to run your scripts is simply counterproductive. Instead, load it once and then run your script using Python “execfile” function. Don’t forget to call “reload”:http://docs.python.org/library/functions.html function for all modules that are part of your applications, otherwise you won’t see the changes until your re-start wsadmin.

* Help function is your best friend, so learn how to use it. I’m talking about the “help” function available for all key wsadmin modules (“AdminConfig, AdminControl, etc”:/admincontrol-vs-adminconfig). Wsadmin APIs, in my opinion, are poorly organized and difficult to learn. “Ten thousand options”:http://publib.boulder.ibm.com/infocenter/wasinfo/v7r0/index.jsp?topic=/com.ibm.websphere.soafep.multiplatform.doc/info/ae/ae/rxml_taskoptions.html available for AdminApp.install function is an example of that. Also, “lists of lists” data structures used by AdminTask and AdminApp are truly baffling. In any event, I usually run a separate wsadmin window that I use solely for consulting “help”. This is much faster than searching for the same information in InfoCenter.

* Finally, you will need a testing environment. You can do some development using a standalone WAS installation but eventually you’ll need to test your code against a Network Deployment environment with deployment manager and, ideally, multiple servers and multiple nodes. In other words, your test environment should resemble the target environments where you’re going to run your scripts. There are many things that are impossible to test with just a standalone profile, one such example is “node synchronization”:/how-to-force-node-synchronization.

This post is part of the series on WebSphere Application Server administration. Please subscribe to our blog if you’d like to receive updates.

Note: We offer professional services in the area of WebSphere architecture, implementation and operations. If you’re looking for help with any of these tasks, please let us know.

WebSphere Administration: Using Thin Administration Client

Most people assume that in order to run WAS admin scripts, you need to have full WAS installation available on the client machine. This is not correct. Starting with WAS 6.1, it is possible to use the so-called “administration thin client”:http://publib.boulder.ibm.com/infocenter/wasinfo/v6r1/index.jsp?topic=/com.ibm.websphere.express.doc/info/exp/ae/txml_adminclient.html instead.

The thin client has many benefits:

* The client consists of only two jars approximately 33MB in size, so you can set it up anywhere. With the traditional wsadmin client, you have to get WAS installed on your machine just so you can run wsadmin scripts. This is especially tedious if you have to deal with multiple versions of WebSphere products (and most large organizations have WAS versions in parallel). With the thin client you can just copy the two jars from an existing WAS installation onto a client machine. The only catch is that IBM JDK (or, more precisely, a JDK containing IBM security provider — on Sun and HP-UX WAS actually comes with the Sun JDK) is still required. You can copy it from an existing install as well (I hope it doesn’t violate any licensing terms).

* Since the client’s size is so small, you can add it to your version control or to your Maven repository. This makes the build more repeatable for developers (your build does include deploying to the application server and “running tests against it”:/build-to-test, doesn’t it?).

* The shell script to run the thin client could be easily customized. For example, you may want to add some Java classes to wsadmin classpath. This will make it possible to invoke these classes from your wsadmin scripts. Or you “may want to use a more modern jython version”:/using-jython-221-with-wsadmin-tool for your scripts. In fact IBM does’t supply a shell script with the thin client, they just provide an “example”:http://publib.boulder.ibm.com/infocenter/wasinfo/v6r1/index.jsp?topic=/com.ibm.websphere.express.doc/info/exp/ae/txml_j2se.html .

You’ll need to make sure that you update your client jars whenever the server installation is upgraded.

Oh, and if you’re using WebSphere ESB/Process Server and want to utilize some of WESB-specific admin tasks (available from AdminTask object), you’re out of luck; the thin client will not support those.

This post is part of the series on WebSphere Application Server administration. Please subscribe to our blog if you’d like to receive updates.

Note: We offer professional services in the area of WebSphere architecture, implementation and operations. If you’re looking for help with any of these tasks, please let us know.

ClassNotFoundException: A List of Dumb Things to Check

You deploy a new version of your application into production environment, hit the application’s URL and get a 500 error with a long error stack and nasty “java.lang.ClassNotFoundException” in bold at the top.

“Class Not Found” exceptions could be quite tricky to troubleshoot because of the complexity of Java Web applications and application servers they run on. An average web application nowadays comes bundled with dozens of jar file (and probably thousands of classes). An average application server’s classpath is many pages long. Not to mention separately deployed libraries containing jar files shared by a group of applications. There should be little surprise that it is quite common for all these different jars and classloaders to clash with each other, get out of sync or become otherwise corrupt and mis-configured.

The list below represents a subset of all the possible causes of “ClassNotFoundException”. Hopefully this list could serve as a starting point for attacking the problem. The list was inspired by “A List of Dumb Things to Check”:http://everythingsysadmin.com/dumb-things-to-check.html.

* To start, determine a type of the offending class. Is it a an application class, a third-party library class, a class provided by the application server or a JDK class? Determine the jar file that should contain the class. Determine where that jar should be located on the file system. Is it part of application installation, application server installation or some shared library installation? You may need to search for the class within multiple jars. Here is the command to do it (source): find . -name *.jar -print -exec jar -tvf {} \; | awk '/YOURSEARCHSTRING/ || /jar/ {print} ' (note–it won’t search within EAR and WAR files)
* Does the jar that’s supposed to contain the class exist on the file system?
* Are you able to “unjar” the jar using jar -xvf? Does the jar indeed contain the package and class in question?
* Check the version of the jar if you can’t find the class there. To determine the version, look at the jar’s MANIFEST.MF. Usually (but, unfortunately, not always) you will find some version information there. You can also compare the file size with the “baseline”.
* Does the account that the application server’s JVM was started with have read access to the jar? An application server usually runs under some sort of a system account. The jar might have been copied to the file system using a personal account from a different group.
* Have all application jars been updated during deployment? Are all the jars (including shared libraries) at the right version? Manual deployment process is quite common, so missing to update a jar is always a possibility.
* Is the class in question packaged with the application (e.g., under WEB-INF/lib) and being loaded by one of the parent classloaders? Most application servers utilize a classloader hierarchy where WAR file’s classloader is a child of EAR classloader which in turn is a child of the system (JVM) classloader. Parent classloaders can’t go down to request a class from a child classloader. The problem occurs if, for example, some jars were moved to a shared library but they still depend on classes packaged with the application.
In order to diagnose this situation, you’ll need to have a good understanding of your application server’s classloader hierarchy. “Here”:http://publib.boulder.ibm.com/infocenter/wasinfo/v7r0/index.jsp?topic=/com.ibm.websphere.base.doc/info/aes/ae/crun_classload.html is the information for WebSphere and “here”:http://download.oracle.com/docs/cd/E15523_01/web.1111/e13706/classloading.htm is the WebLogic documentation on classloaders.
* Is any of the jars packaged with the application also present on any of the parent classloader’s classpath? Running different versions of the same jar or library can cause all kinds of issues, including ClassNotFoundException. Some app servers allow overriding default classloader behavior so that the jars packaged with the application are loaded first. This could fix the problem.
* If the jar with the class in question is part of a shared library (as opposed to packaged with the application), check if this library was made available to the application via the classloader configuration. For example, WebSphere configuration involves setting up a separate classloader for the library and explicitly associating it with the application.
* Is the version and patch level of the application server correct? Does it match your development environment? Look at the detailed version information for all the different components of your app servers and also get a list of installed patches. E.g., for WebSphere run versionInfo -long command.
* Is the application server running under the right JDK? E.g., check if the server startup script relies on JAVA_HOME and see which JDK the JAVA_HOME points to.
* If the application runs in a cluster, does the problem occur on all nodes or just on some? Are you trying to troubleshoot the problem on the right node?
* If the classname is driven from a string, either in java source or some other file, have you spelled the class name correctly? (“Steve Loughran”:http://www.1060.org/blogxter/publish/5)

Once again, this is by no means a complete list. If anybody wants to contribute, please add a comment below and I’ll update the post.

Automating Your Builds? Don’t Forget About Testing

You’re part of a development team that just started working on a brand new Java EE application and you’re asked to put together a build script for this app. “Nothing can be easier” you think and you quickly put together a [simple Ant script](http://techtracer.com/2007/04/16/the-great-ant-tutorial-a-great-jump-start/) or a Maven POM file. Your build compiles Java code, runs JUnit tests and creates a WAR file for your app. Your job is done and you move on to more exciting and important tasks.

Unfortunately, your simple build, while being a good starting point, does not accomplish much. Contrary to what many developers think, the purpose of an automated build is not to automate production of executable code (be it a WAR file or an “exe”). Its purpose is to verify correctness of the code and to discover as many problems and defects as possible as quickly as possible.

It is common knowledge that it is much less costly to fix a defect during construction than during testing phase:

![Cost to fix software defects](/files/images/defect_cost.gif “Cost to fix software defects”)

According to the chart above (source: [Six Sigma](http://software.isixsigma.com/library/content/c060719b.asp) and IBM Systems Sciences Institute) it is two times more costly to fix a bug during testing than during implementation. I think this difference is actually much higher. Our short-term (working) memory is extremely volatile. According to [some studies](http://www.cs.umd.edu/class/fall2002/cmsc838s/tichi/attention.html), the short term memory begins decaying after eighteen seconds. The cost of “context switching” for the brain [is very high](http://www.codinghorror.com/blog/archives/000691.html). In most organizations testing cycle takes at least a few weeks. This means that the bug that you just introduced will not be discovered for another few weeks at the earliest. When (or if!) it is finally discovered, most likely you’ll be working on something entirely different. It will take at least a few hours for you just to recall all the details associated with the bug.

So the fact that your code compiles serves as a very weak indicator of code quality (although catching compilation problems early is important too, especially for large teams with high check-in volume). Automated testing must be done as part of every build. Most developers implement some automated testing using XUnit. In the majority of cases, these tests do not run against a deployed application, e.g., they do not hit a Web server. This kind of testing is useful, but it has its limitations. The main limitation is that we are not testing the application from the standpoint of its end users. For example, we’re not testing AJAX logic running in a browser. Also, we’re not testing the functionality that is dependent on an application server. Mock object frameworks help to a degree, but emulating application server’s behavior could take some effort. Not to mention the fact that the “emulated” app server won’t account for quirks of your “real” application server. In many cases there are subtle differences in app servers behavior, which is very often caused by differences in how classloader hierarchy is implemented. Reproducing these nuances using mock frameworks or even an embeddable servlet container, such as [jetty](http://www.mortbay.org/jetty/), is impossible.

The bottom line is that your automated build has to be able to deploy your application and run tests against it. Using a browser-based testing tool such as [Selenium](http://seleniumhq.org/) will allow you to test your application as if it was used by end users, including testing of all your fancy AJAX features. Automating application deployments and testing does take some effort. Developing a comprehensive automated test suite could be a daunting tasks. But it is [certainly possible](http://timothyfitz.wordpress.com/2009/02/10/continuous-deployment-at-imvu-doing-the-impossible-fifty-times-a-day/) and well worth it.

Creating Ant Targets in Python with PAnt 2.0

We’ve just released a new version of PAnt, a tool for developing build scripts in python. The key new feature of PAnt 2.0 is the ability to create Ant targets directly from python. This allows for completely getting rid of Ant XML files and for developing build scripts entirely in Python.

Here is an example:
@target(unless=”prop.name”, depends=ptarget1)
def p_target2():
“””Python project ptarget2″””
ant.echo(“echo ptarget2”)

You can find more details about creating targets from PAnt here.

PAnt 1.5 is Released

This is a major update to our popular python Ant wrapper.

Notable changes in this release:

* Support for positional (as opposed to named) arguments, e.g., “pant.echo(‘message’)”.
* Support for lists to express repeating elements.
* Support for “ant_” prefix to avoid conflicts with python keywords.

More information is available from PAnt project page

Please subscribe to our feed or follow us on twitter to continue receiving updates about PAnt – new version is coming shortly.

Eliminate the Need to Redeploy Your Web Files

Some application servers require that location of the development workspace has to be different from the location of the deployed application. For example, you can easily point Tomcat to the root of your Web application using “docBase” of the “Context” element. But you’re out of luck with WebSphere Application Server (WAS). You have to go through a separate application update process (using admin console or Rational Application Developer tooling) to synchronize your deployed application with the workspace. In my view, this update (a.k.a. “deployment”) step should never be required in a local development environment. It is one thing to have to deploy to a test or a production environment that consists of multiple servers that are segregated from the machine hosting the build artifacts. But in a situation when both the code and the application server are sitting on the same machine, the deployment step is redundant. We should be able to simply tell the app server where the code is and it can then do whatever is needed to load the code into JVM.

Luckily, we can get pretty close to this vision with a few very simple (and free) tools.

In my previous post I explained how to enable dynamic class reloading for WebSphere Application Server and avoid having to deploy your Java changes altogether. But what about changes to JSPs and other non-Java resources? How can we synchronize the directory used by the application server with the development workspace?

Turns out, there is an Eclipse plugin that does exactly that. It’s Filesync plugin developed by Andrei Loskutov.

As the name implies, the plugin automatically synchronizes workspace directories with external directories by doing one-way copy of changed files. It allows to specify multiple directory pairs and also to define include/exclude patterns and even use variable substitution.

To enable automatic updates of JSPs in the deployed application directory all you need to do is to define a folder pair that links web root in your workspace with the location of the exploded WAS directory in WAS (usually located under profile_root/installedApps/cell_name/app_name.ear/app_name.war).

With WAS you need to watch for static “<%@ include %>” directives in your JSPs. WAS will not reload included files unless you also update including JSP. A workaround here is to turn everything into “jsp:include” actions or use JSTL’s “c:import”. There might be a slight performance penalty for doing that but improved productivity is well worth it.

You can use Filesync plugin to synchronize your class files as well. This provides an alternative to the resource link-based approach that I described in the previous post. I still like using resource links better because they can be defined using Eclipse variables which makes it easier to share the configuration within a team. As far as I can tell, with Filesync you have to use absolute paths.

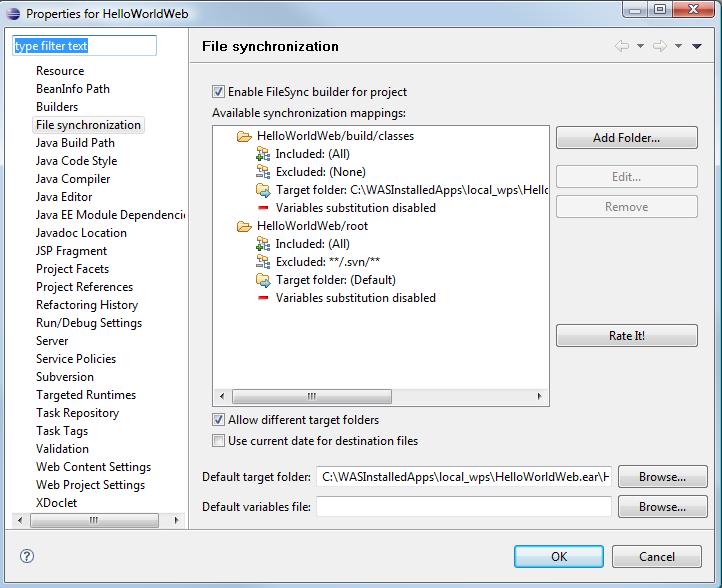
Here’s how the filesync configuration screen looks like:
Filesync configuration

Another good use of Filesync is to pull jar files from an external directory. Projects typically have a repository-like location where all third-party jars are checked-in (or it could be a full-blown Maven repository). You can easily add an external jar to your classpath in Eclipse. But how to put it under “WEB-INF/lib” where it needs to end up for the application server? With filesync it can be done easily by adding yet another folder pair.

In short, Filesync allows you to assemble your application “on the fly” without having to run an external build process. It also completely eliminates the need to explicitly update deployed applications.

Instantly Redeploy Your Classes to WebSphere Application Server

Any developer wants to see the code changes instantaneously reflected in the application server.
However, when using WebSphere Application Server (WAS), developers usually have to go through the process of deploying an application to the server. Even though the deployment support is integrated into Rational Application Developer (RAD) or Eclipse WTP, it still introduces delays and impedes productivity. Not to mention that Eclipse WTP does not actually support WAS 6.1 runtimes, only 6.0.

This is unfortunate because actually WAS 6.1 has good support for dynamic reloading. With dynamic reloading turned on, WAS monitors changes on the file system and automatically reloads the module (i.e., all classes loaded by the module’s classloader) when it detects a change. The reloading is almost instantaneous for simple modules. For complex modules with a lot of classes or initialization logic the reloading step could take a little bit of time but it is still faster than redeploying an entire application (you should check out Java Rebel if you want a truly instantaneous deployment).

With dynamic reloading all we need to do in order to make our changes available to the server is to update class files in the location where the deployed application resides. This is especially straightforward for web application and classes under WEB-INF/classes since WAS always explodes web application archives during deployment. In case of jar files (say the ones under WEB-INF/lib) the situation is a more complicated.

Unfortunately, the location of the deployed application is usually different from the workspace where a developer makes changes. By default, deployed binaries are located under profile_root/installedApps/cell_name. While this location can be changed, the directory structure will still be somewhat different from how code is organized in the workspace.

We could write a simple Ant script to copy changes, but this again introduces a special “pseudo-deployment” step. It would be nice if we could simply make a change in Eclipse, save it and let dynamic reloading kick in without any extra steps.

Turns out that it is quite possible to make WAS and Eclipse behave this way.

First, let’s configure WAS:

* Log in to WAS admin console and make sure that “Run in development mode” is checked for your sever. This is the default for standalone installations.
* Deploy your application to WAS using WAS admin console.
* For convenience, you may want to specify a non-standard location for application binaries during installation to shorten the path, e.g., “was_installed_apps”. This step is optional.
* Go to “Enterprise applications/your_app/Class loading and update detection”.
* Make sure that “reload classes” is checked.
* Set reload interval to some reasonable number, say “3”. By default it’s set to “0” which means “never”. IBM recommends 3 seconds as an optimal interval, although I’ve been using 1 second without any issues (for relatively small modules though).
* Stop and start the application.

Now let’s configure Eclipse. We will have to create a resource link pointing to the deployed application and configure the project to compile classes to the deployed location.

* Go to “Java Build Path” of the project. Click on “Browse” next to “Default output folder”.
* Click “Create New Folder…”, “Advanced”, check “Link to folder in the file system”.
* Click on “Browse” and locate the root of the exploded WAR file in the deployed application location. For example, for application “HelloWorldWeb” the path will be “profile_root/installedApps/cell_name/HelloWorldWeb.ear/HelloWorldWeb.war”. Give the link a meaningful name, e.g., “deployment”. Note: if you share .project and .classpath files with other developers, use Eclipse variables instead of the absolute path.
* Click OK. This will create a resource link that you can use to specify the output folder.
* Change the output folder to point to “project_name/link_name/WEB_INF/classes”, e.g., “HelloWorldWeb/deployment/WEB-INF/classes”. Click OK.
* Eclipse will recompile your project.
* From this point forward any class change will trigger dynamic reloading on the server.
* The resource link is also available in your package explorer, so you can browse and edit the deployed files. You need to be careful if you want to edit JSPs or other files that way as they will be overridden by the next full re-deployment.

This techniques takes care of class files only. Dynamic reloading of JSP files is a different story.

Note: This has been tested only with Eclipse 3.4 and WAS 6.1 and on modules with a relatively small code base. I’d be curious to know how effective this approach is for large modules.

This post is part of the series on WebSphere Application Server administration. Please subscribe to our blog if you’d like to receive updates.

Note: We offer professional services in the area of WebSphere architecture, implementation and operations. If you’re looking for help with any of these tasks, please let us know.

WebSphere Administration: Setting Heap Size

Setting maximum heap size and changing other JVM parameters is a fairly common administration task.
JVM configuration might be changing quite often during application development, usually as a result of performance testing.

Typically JVM parameters have to be updated for all application servers in a cell or at least for application servers that belong to a particular cluster.

Conveniently, WebSphere Application Server (WAS) supports updating JVM parameters using its administration APIs, specifically, AdminConfig object. This is illustrated by the script below.


import sys

"""
Change JVM heap size for all application servers in a cell
"""
# New heap size is passed as a parameter to the script
max_heap_size=sys.argv[0]

# Get the string with config ids of all serves
server_confids=AdminConfig.list("Server")
# Iterate over all servers - config ids are separated by \n 
for server_confid in server_confids.split("\n"):
    server_confid=server_confid.strip()
    # obtain the type - types are APPLICATION_SERVER, DEPLOYMENT_MANAGER, NODE_AGENT, WEB_SERVER
    server_type=AdminConfig.showAttribute(server_confid, "serverType")
    # we're changing the heap size for application servers - we want to exclude node agents, etc.
    if server_type == "APPLICATION_SERVER":
        server_name=AdminConfig.showAttribute(server_confid, "name")
        # this is the query to get JavaVirtualMachine configuration object for a particular server
        jvm_path="/Server:%s/JavaProcessDef:/JavaVirtualMachine:/" % server_name
        jvm_confid=AdminConfig.getid(jvm_path)
        # "modify" accepts  a list of lists - each list contains name and value (odd choice I must say, why not use tuples?)
        AdminConfig.modify(jvm_confid, [["maximumHeapSize", max_heap_size]])

# Commit our changes to the repository        
AdminConfig.save()

This post is part of the series on WebSphere Application Server administration. Please subscribe to our blog if you’d like to receive updates.

Note: We offer professional services in the area of WebSphere architecture, implementation and operations. If you’re looking for help with any of these tasks, please let us know.

Dynamic Ant Tasks without Setters

Ant uses reflection to pass data from XML to the Java class that implement an Ant task. For every attribute in XML, you have to define a setter in the Java task’s class.

This works fine most of the time, however, in some cases there could be a need for a dynamic list of attributes. For example a task can pass attribute values to some external tool that has its own set of parameters that you don’t want to hardcode in Ant. Or you may simply like the flexibility of using dynamic attributes as opposed to predefined setters.

In order to implement dynamic attributes, first you need to override “maybeConfigure” method in your Ant task and have it do nothing:


public void maybeConfigure() throws BuildException {
}

Then in your “execute” method you can access the map of attributes (that represents all attributes set in XML) as follows:


RuntimeConfigurable configurator= getRuntimeConfigurableWrapper();
Map attributes=configurator.getAttributeMap();
String attr1=(String)attributes.get("attr1");       

Note that in this case Ant does not do property substitution (for ${}), so you would need to explicitly invoke project.replaceProperties for each attribute value.